-The Black Rack-
This page is still under construction, but feel free to look around and get an idea of whats going on here.
This rack is the work horse of every creature kept here except the snakes. There is a water turtle variant, a Lizard / tortoise variant, and of course the rat variant.
This rack is designed loosely off of this rat rack write up, with some modifications to make it tortoise/lizard friendly. If youre building for rats, theres really no need to read further. Just follow the link here and you'll be set. For the rest of us, read on...
First were making this 6 tubs high, with additional heating (and a side benefit of support) from the bottom. It also fits another lamp, and uvb fixture ontop assuming you stick to the plan. Spacing is tight here guys, so keep that in mind if you decide to start substituting. It also has vinyl laid into the top section to hold better humidity. I'll be the first to say, 'These arent show racks'... If youre looking for something to display for your front room, meh, not so much.
if youd like the ease of a pull out rack system, with all its glorious perks (space saving, soo much easier to clean etc) without sacrificing the square footage of space that you know you want your critter to have... These might be right up your ally.
Materials
For one of these racks you will need:
6 - Large mixing tubs
8 - 1” x 2” x 8’s
7- 2x2x8'
4- 2x2x4"
1- 8'x4' plywood board 15/32", size does matter, cut into at least 5- 1x2' boards & 1
2x3' plywood board ^
·6 - pieces hardware cloth 36 ½” x 24”,
^warning do NOT use plastic it will melt. bad jubejube. Do not use window screen, it doesnt let uvb through,
and also gets very very hot.
6- pieces thick vinyl 30" x24"
· 1 - staple gun and box of staples (1/2” staples)
· 1- corrugated plastic sheet 3x2'
(about ¼” thick- spacer for the tubs)
· A box of 2 ½” screws.
Heat & Lighting
6- 11" flexwatt, 2' long each
6- under cabinet fixtures, 18"
6- clamp lamps (reflectors removed) any medium base light socket will do so long as the reflector is removed.
6- aluminum loaf pans, this is the size I use. I dont think others will fit the space, so probably best to stick to it k?
6- uvb (if required), I use exoterra 5 or 10 depending on species, second smallest fits this fixture.(18"). Feel free to use preferred brand bulb but it must be T8 to work with fixture above
6- E26 TUBE light bulbs, wattage depending on how much heat needed. Any medium base tube light bulb that fits inside the pans will work. In my set up, (hot humid dedicated reptile room) I find I only need to use 15watt bulbs between this and the flexwatt. they make them out to 60 though. Oh and remember, LED lights give off pretty much no heat.
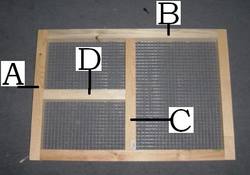
These are the cuts you will need …
· A 12 – 24 ¼” x 1” x 2”
· B 12 – 33 ¾” x 1” x 2”
Ignore C & D, we dont need that unless building for rats
· E 12 – 36” x 2” x 2”
. F 12 - 12"x 2"x2"
· G 4 – 72” x 2” x 4”
-Q 7 - 12"x 24" plywood boards 15/32 (1 8x4' plywood sheet cut into 7 of these pieces & 1 2x3' piece)
- Bottom: 1- 2'x3' plywood board
A, & B are used to make the lids.
E makes the full slide for the tubs.
F supports the plywood boards, and acts as a runner.
G Is the legs. please dont use 2x2's instead of 2x4's here ok? Its not pretty. Thanks.
Q is the bottom supports where the flexwatt is attached, the seventh is used as a spacer
By the way, I am not particularly a carpenter either. So I use this nifty cutlist site to optimize the cuts for my projects.
Heres the cuts! See got all the hard parts done for ya ;)
6 - Large mixing tubs
8 - 1” x 2” x 8’s
7- 2x2x8'
4- 2x2x4"
1- 8'x4' plywood board 15/32", size does matter, cut into at least 5- 1x2' boards & 1
2x3' plywood board ^
·6 - pieces hardware cloth 36 ½” x 24”,
^warning do NOT use plastic it will melt. bad jubejube. Do not use window screen, it doesnt let uvb through,
and also gets very very hot.
6- pieces thick vinyl 30" x24"
· 1 - staple gun and box of staples (1/2” staples)
· 1- corrugated plastic sheet 3x2'
(about ¼” thick- spacer for the tubs)
· A box of 2 ½” screws.
Heat & Lighting
6- 11" flexwatt, 2' long each
6- under cabinet fixtures, 18"
6- clamp lamps (reflectors removed) any medium base light socket will do so long as the reflector is removed.
6- aluminum loaf pans, this is the size I use. I dont think others will fit the space, so probably best to stick to it k?
6- uvb (if required), I use exoterra 5 or 10 depending on species, second smallest fits this fixture.(18"). Feel free to use preferred brand bulb but it must be T8 to work with fixture above
6- E26 TUBE light bulbs, wattage depending on how much heat needed. Any medium base tube light bulb that fits inside the pans will work. In my set up, (hot humid dedicated reptile room) I find I only need to use 15watt bulbs between this and the flexwatt. they make them out to 60 though. Oh and remember, LED lights give off pretty much no heat.
These are the cuts you will need …
· A 12 – 24 ¼” x 1” x 2”
· B 12 – 33 ¾” x 1” x 2”
Ignore C & D, we dont need that unless building for rats
· E 12 – 36” x 2” x 2”
. F 12 - 12"x 2"x2"
· G 4 – 72” x 2” x 4”
-Q 7 - 12"x 24" plywood boards 15/32 (1 8x4' plywood sheet cut into 7 of these pieces & 1 2x3' piece)
- Bottom: 1- 2'x3' plywood board
A, & B are used to make the lids.
E makes the full slide for the tubs.
F supports the plywood boards, and acts as a runner.
G Is the legs. please dont use 2x2's instead of 2x4's here ok? Its not pretty. Thanks.
Q is the bottom supports where the flexwatt is attached, the seventh is used as a spacer
By the way, I am not particularly a carpenter either. So I use this nifty cutlist site to optimize the cuts for my projects.
Heres the cuts! See got all the hard parts done for ya ;)
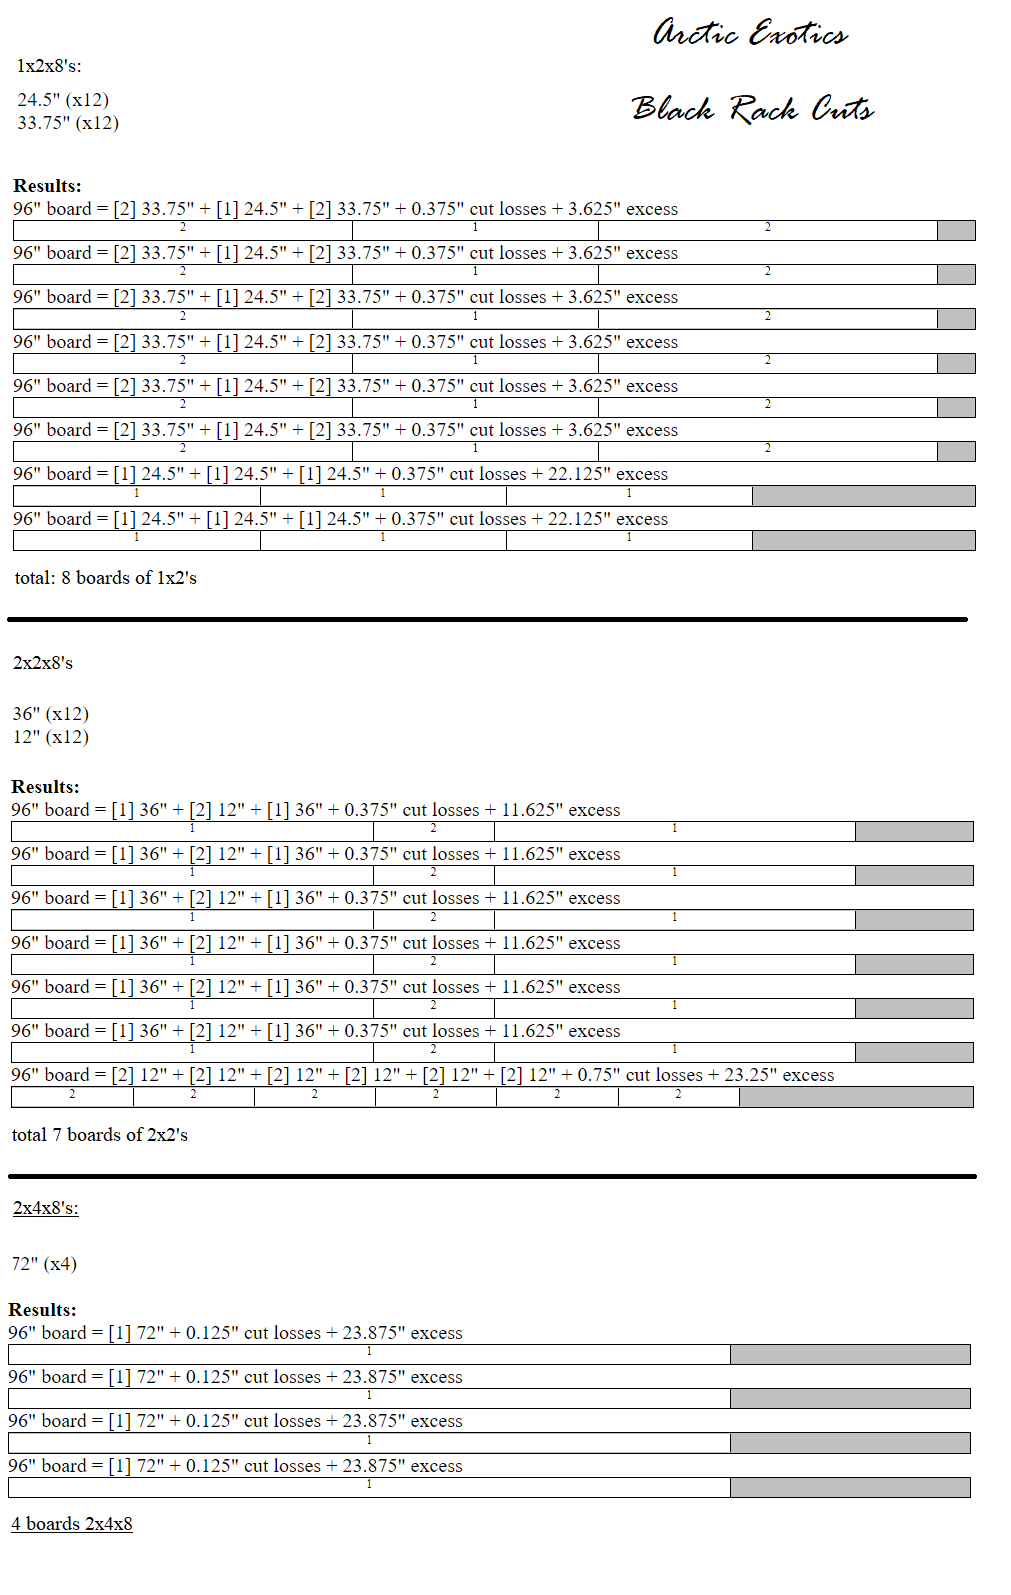
Home depot will often make these cuts for free, and if not they typically charge $0.25 a cut if you catch a grumpy employee.
| black_rack_cuts.png |
^ Heres a copy of the cuts you can print out and bring with you to the lumbar store :)
And for the plywood...
And for the plywood...
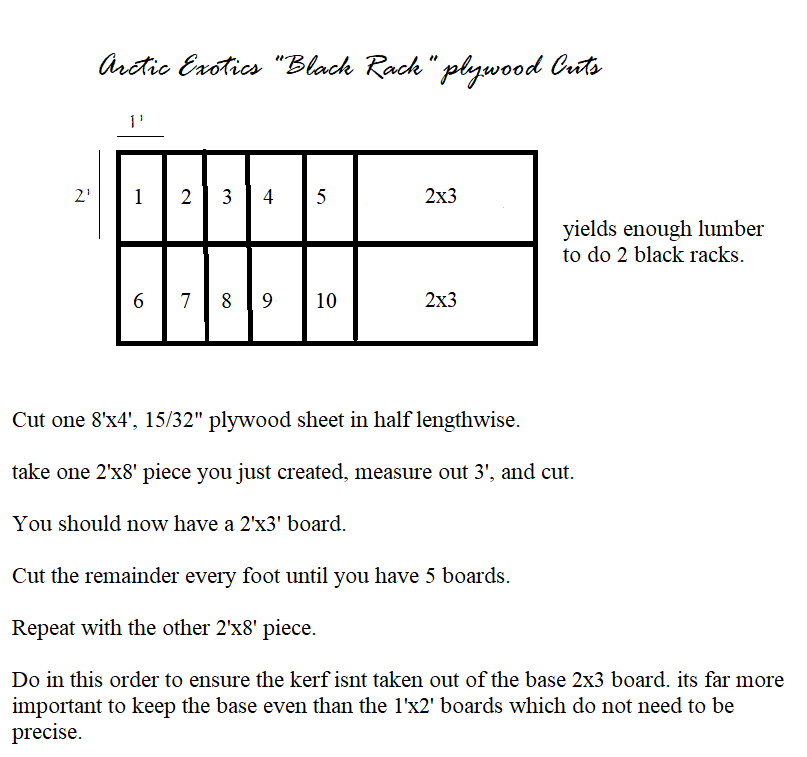
| black_rack_plywood_cuts.png |
^ again here is a copy for printing^
If you purchase one 8x4' board, you can make two racks out of it, being that its often the same price or even more expensive to buy a smaller board, this just makes sense. you can keep the second set if you decide to make another one later ;)
If you purchase one 8x4' board, you can make two racks out of it, being that its often the same price or even more expensive to buy a smaller board, this just makes sense. you can keep the second set if you decide to make another one later ;)
-The Build-
Alright so youre back from the lumbar store, ya got all your supplies ready, lets get to work...
PART ONE: Assess the working space
Remember this rack is not on wheels and it is pretty heavy for this 130lb girl to haul around by herself, so you may need to consider first if you're going to need to build this one inside the room its in. It's 28 inches wide and that can be snug on some doors. better check it out first. take your corrugated plastic spacer and place it on the ground to get an idea how much space you have to work with. Thats 2x3', give yourself another foot on each side if you can.
PART TWO: LIDS
Put 'B' inside 'A' (reference above photo) to make the rectangle, use a clamp if you like (I love clamp!)... screw them together, thats the frame.
Staple the vinyl over the frame. doesnt need to be perfect, just a few staples in will do.
Staple the hardware cloth On top of the vinyl. The vinyl should now be sandwiched between the frame and the hardware cloth. Get these staples in good and tight, like one every inch or two. you want the tubs to slide nice under these.
Alright thats the lids. Do 6x over until you have them all. Careful working with the hardware cloth. It'll bite you. I prefer a pair of twig/small branch pruning sheers for cutting it. It can be done with scissors but that'll really suck for your hands.
PART THREE: STRUCTURE ORDER
I am not a carpenter type, I don't do a ton of math to find placements and mark them etc. I do these by following a specific order. If you follow the order your spacing will be correct and there will be no issues.
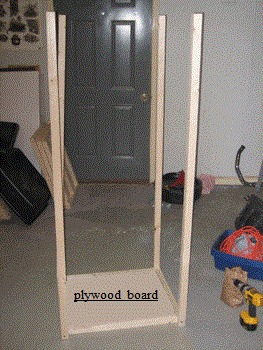
Ok so the first thing you need to do is to take two of the legs, a frame, and the 2'x3' plywood board. Set the plywood and one frame on the edge, as shown in the picture below and lay the two legs on top of them. The legs will be attached to the sides of the plywood board, but not to the frame. The frame only serves to keep the legs level while they are attached to the plywood board.
You will attach the plywood board to the ends of the two legs. The legs should be flush with the edges of the frame. This board will be the bottom of the rack.
I am not a carpenter type, I don't do a ton of math to find placements and mark them etc. I do these by following a specific order. If you follow the order your spacing will be correct and there will be no issues.
Ok so the first thing you need to do is to take two of the legs, a frame, and the 2'x3' plywood board. Set the plywood and one frame on the edge, as shown in the picture below and lay the two legs on top of them. The legs will be attached to the sides of the plywood board, but not to the frame. The frame only serves to keep the legs level while they are attached to the plywood board.
You will attach the plywood board to the ends of the two legs. The legs should be flush with the edges of the frame. This board will be the bottom of the rack.
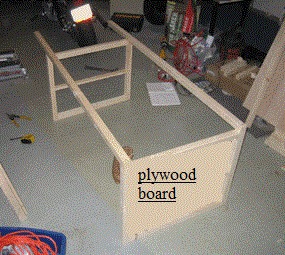
Then flip the whole thing over and attach the other two legs in the same fashion to the other side.
Now flip the rack on its bottom so that the board you just attached is flat on the floor and the four legs are in pointing up. Be careful when moving/standing it up since the legs have very little support until you get at least the first frame in.
Now flip the rack on its bottom so that the board you just attached is flat on the floor and the four legs are in pointing up. Be careful when moving/standing it up since the legs have very little support until you get at least the first frame in.
Ok so for the first unit, you:
Place the tub down (on the board),
place the corrugated plastic sheet ontop of the tub,
place the lid, hardware cloth side down, ontop of that
Screw in through the 2x4 and into the frame of the lid.
first unit is done. you dont need to install the runners under the lip of the tub on the first (very bottom tub), but it does help it slide easier. The very first flexwatt sits under the tub when we get to the heating section.
Unit two:
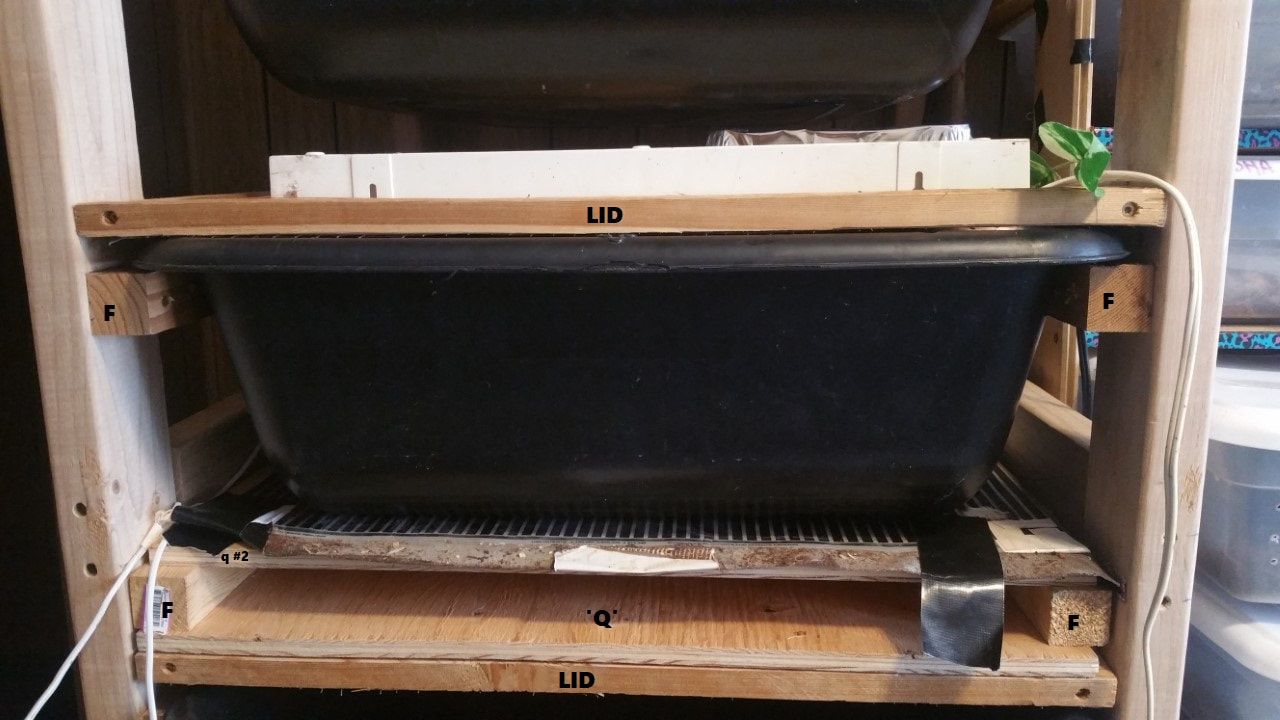
Take one of the 1x2' plywood boards (marked Q in the ^picture), place it ontop of the frame you just screwed in. do not screw this in.
take 2 of the F (2"x2"x1') pieces, and place them at the edges of the legs. Screw these into the legs.
Take another Q board, place it ontop of the F that you just screwed in. This is Q#2
Screw this Q#2 board downwards into the F pieces.
Remove Q from under the first (F) pieces
Place tub ontop of this assembly
place corrugated plastic sheet ontop of that
Place lid ontop of that.
Screw lid into legs
Using a clamp, or another person to help, hold an F board under the tub, doesnt need to be too tight, but line them up under the lip of the tub. Although the first 12" are supported from the bottom, the back two thirds are supported by these runners. They're the F's on the top just under the tub's lip in the picture. Screw these into the legs.
After that its just repeating these steps (in section Unit Two) until all 6 units are in.
Adding The Heat
Lights:
1) remove the reflectors off the work lamps
2) cut a hole in the side of the loaf pans just big enough to fit the tube lights through it
3) screw the tube lights through the loaf pans and into the work lamp.
1) remove the reflectors off the work lamps
2) cut a hole in the side of the loaf pans just big enough to fit the tube lights through it
3) screw the tube lights through the loaf pans and into the work lamp.
To install uvb you simply replace the tube light that comes with the fixture, with the uvb tube light. then place in the space ontop of the lid of the tub you want it on. The assembly picture shows this^
Heat:
If the bulb alone doesnt put out enough heat for your needs (possible), you can place flexwatt heat tape under the tub you want to heat easily without effecting the use of the tubs. you simply affix it to the board under the tub you want to heat, and plug it into your rheostat. If you need them, here are flexwatt wiring instructions.
Note: flexwatt is known to catch fire if used without a rheostat (temperature controller), obviously on a wooden rack a fire would be a very bad thing. please, please do not use flexwatt uncontrolled. Your life and the life of your animals is worth the time and cost of acquiring one should you not have one already. A good entry level one costs about $40, and come in many forms, even a seedling heat mat regulator sold at garden shops would work. just dont let it run without something cutting the power if it overheats ok? k.
feel free to message me if you need some help with it. Ill be adding more pictures soon too.
Thanks for reading :)

